If you’re looking to bring a little mischief and a whole lot of holiday cheer to your Christmas table, this Grinch Charcuterie Board is the perfect show-stopping centerpiece.
Here is everything you need:
Get Charcuterie Supplies on Amazon #ad
Inspired by everyone’s favorite green grump, this playful board blends festive creativity with delicious flavors—bright fruits, creamy cheeses, savory meats, and colorful accents all arranged to form a whimsical Grinch face your guests will adore.
This board is guaranteed to steal the spotlight (and maybe a few hearts along the way). Get ready to wow your guests with a charcuterie board that’s equal parts tasty and delightfully naughty!
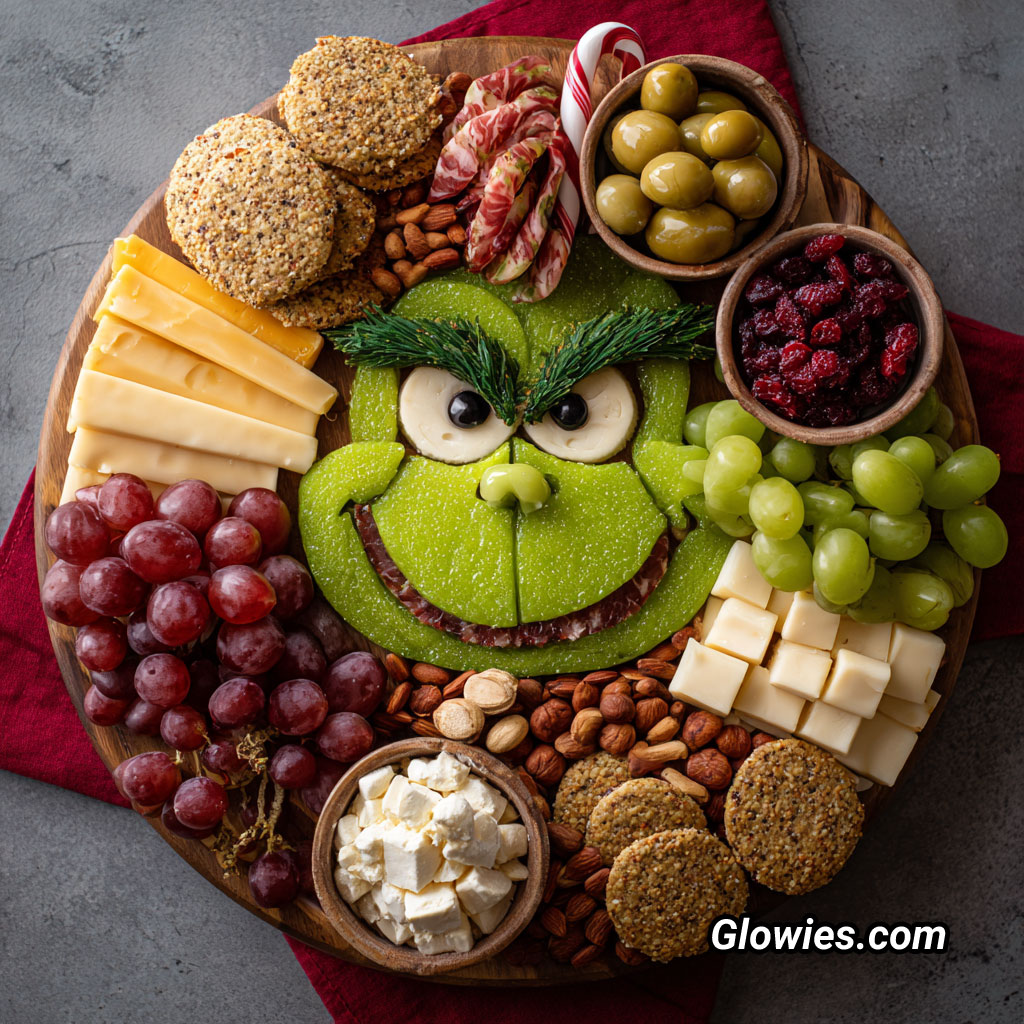
GRINCH CHARCUTERIE BOARD RECIPE & DIRECTIONS 🎄
⭐ WHAT YOU NEED
For the Grinch Face (centerpiece):
- 1 large round platter or wooden board on Amazon #ad
- Green apple slices or green-dyed cheese slices (Havarti or provolone works great)
- Thin slices of salami or prosciutto (for the mouth shading)
- 2 round slices of white cheese (provolone or mozzarella) for the eyes
- 2 black olives (cut in half) or black grapes for pupils
- A small piece of green grape, kiwi, or green cheese for the nose
- Fresh rosemary or dill sprigs for eyebrows
- A small dab of cream cheese to help pieces stick if needed
For the Surrounding Snacks:
Feel free to mix and match, but this is what matches the picture:
- White cheddar cubes
- Sliced cheese (mild cheddar, gouda, or Colby Jack)
- Green grapes
- Red grapes
- Olives (green, pitted)
- Dried cranberries
- Almonds
- Pistachios
- Crackers (round, seeded, multigrain)
- Small bowl of feta or soft cheese
- Peppermint candy canes (optional holiday touch)
- Cured meat flowers (salami roses)
🧩 HOW TO ASSEMBLE THE GRINCH FACE
1. Create the Base Shape
Use your green cheese or green apple slices to shape:
- The Grinch’s main head oval
- His cheek circles
- Chin and forehead
Place the pieces tightly so it looks like one smooth shape.
2. Build the Eyes
- Cut two circles of white cheese.
- Place slightly tilted to give that classic Grinch “mischievous look.”
- Add a half olive or black berry to each eye.
- You can use a tiny bit of cream cheese to secure the pupils.
3. Add the Nose
Use a small chunk of a green grape, kiwi, or green cheese chunk
Shape it into a round-ish oval and place it centered between the eyes.
4. Add the Mouth
- Create the Grinch’s smirk using salami or prosciutto slices.
- Lay the meat under the lower cheese pieces so it peeks out like a grin.
- You can adjust the curve until it looks right!
5. Add Eyebrows
- Use fresh dill, rosemary, or small pine-like herbs to mimic the wild Grinch eyebrows.
- Arrange the herbs thick and arched for expression.
🍇 FILLING THE BOARD AROUND THE GRINCH
Place items in full groups for a clean, abundant look:
Left side:
- Red grapes
- Sliced cheese stacks
- Crackers
Right side:
- Green grapes
- Cheese cubes
- Crackers
Top area:
- Small wooden bowls of:
- Green olives
- Dried cranberries
- Candy canes tucked beside the bowls
- A few salami roses or folded meats
Bottom area:
- A pile of nuts (almonds, pistachios)
- A small bowl of feta or soft cheese
Fill all empty gaps with nuts or grapes to make the board look full and festive.
🎨 TIPS FOR A PERFECT GRINCH LOOK
- For bright green color:
Use green-tinted Havarti or color mild cheese using a very light brush of water + food coloring gel. - For neat edges:
Cut cheese using a sharp knife or an oval cookie cutter. - For a glossy finish:
Lightly brush apples with lemon juice to prevent browning. - Keep cold until serving so everything stays firm and shaped.